Showing posts with label Birthday. Show all posts

Thursday, August 9, 2012

Happy Boo Day Card

Hello Stampin' Friends!

This is my second card I made for Convention 2012 for my individual swaps.  This card ended up being very popular!!  I made 100 of them and I think I only have a few left!!

So, the first 5 people who email me and comment on my card, I will send you one!  Be sure to give me your address when you email me!  I will announce the winners once I have all 5!

This is just a card front, not a full card.  But I would be happy to send one to you if you would like one as a sample.  Just email me and comment on this card here on my blog!!

I call it - Happy Boo Day

SU! Supplies
Stamps - Googly Ghouls, Wacky Wishes, Fabulous Phrases
CS - Very Vanilla, Basic Black, Rich Razzleberry
DSP - In Color 2011-2013 Collection - Lucky Limeade Stripes
Inks - Basic Black, Lucky Limeade, Rich Razzleberry, Stazon Black
Bigz Dies - Top Note, Typeset Alphabet
Punches - Little Labels
Ribbon - 1/8" Taffeta - Basic Black
Embellishment - Googlies
Misc - Big Shot, Glue Dots, Dimensionals, Daubers/Sponges

I think this turned out really cute, and the Googly Eyes just push it to that extra cute category.  This card would be great as a Halloween Card or if someone has a Birthday around Halloween, it's great as one of those "dual" cards.

Hope you Enjoy!

Sunday, July 29, 2012

Dresser Step-Card

Hello Stampin' Friends,

So, as I said before I participated in a swap that was called Over the Top.  Well, right afterwards we had a "specialty" swap and I was in one called Bling it On.  This "specialty" swap in particular was to have bling, which could be jewels, glitter, brads, pearls, etc.  I must say that it was another great swap that I hope to do again.

Here is the card the I made for the Bling it On Swap.

I call this the - Dresser Step-Card


SU! Supplies Used
Stamps - Just Believe, Petite Pairs
CS - Crumb Cake, Wild Wasabi, Very Vanilla, Pink Pirouette
Inks - Crumb Cake, Wild Wasabi, Rose Red
Punches - Word Window, Curly Label, Scallop Edge, Itty Bitty Shapes
Brads - 3/16" Metallic
Jewels - Basic Pearls
Ribbon - 3/8" Taffeta - Pink Pirouette
Crochet Trim - Victoria
Misc - Paper Piercer, Dimensionals, Glue Dots, Sticky Tape

For this step-card you cut directly center to make the 2 separate sections.  For the dresser side you cut 3 rectangles for the drawer fronts, sponge edges with Crumb Cake Ink.  Using the Paper Piercer & Mat pierce the holes for the brads on one drawer front, then so that they will all match and align up correctly stack the others 2 under the 1st pierced block and using those holes pierce through all layers.  This easier then trying to get it exactly by eyeballing it.  Place you 3/16" Metallic Brads, whatever color you like.  Cut a small piece, about 1", of the Victoria Crochet Trim and place some Sticky Tape over the front and back of the drawer front and place your crochet trim on top of sticky tape.  Makes it look like something is hanging out of one of the dresser drawers.  Attach the dresser drawer fronts to the left side of card using Dimensionals.  Then using the Curly Label Punch, punch half of the design on the bottom left center of the card to form the legs of the dresser.   Now, for the right side of the card you need to cut a piece from Wild Wasabi CS and sponge edges with Wild Wasabi Ink.  Cut a smaller piece of Very Vanilla CS and stamp the stem images from the Just Believe Set using Wild Wasabi Ink, sponge edges with Wild Wasabi Ink also. Punch 4 flowers from Pink Pirouette CS using the flower from the Itty Bitty Shapes Punches.  Sponge the edges of the flowers with Rose Red Ink.  Adhere 3 of the flowers to the stem image and add a small Basic Pearl to each flower center.  Make a knotted bow from the Pink Pirouette Ribbon and adhere to stem image block.  Stamp the "Friends" in Crumb Cake Ink onto a piece of Very Vanilla CS and punch out with the Word Window Punch.  Sponge the edges of word window with Crumb Cake Ink.  Using the Scallop Edge Punch, punch the bottom center of the right side just to give a little accent.  Then attach the "Friend" word window just above punched area with Dimensionals.  Now adhere the stamped image block to right side front.  Front of card is finished.  For the inside I stamped the sentiments from the Petite Pairs Set onto Very Vanilla CS using Wild Wasabi Ink.  Then you need to punch out the sentiment using the Curly Label Punch and then sponge the edges with Crumb Cake Ink.  Next adhere the 4th flower from earlier to the top left corner and add a small Basic Pearl to center.  Adhere to left side center of inside card with Dimensionals.

Ta Da!  All done, and oh so very cute!  You could do this same style card using toys for more of a kids card, or even make it using some baby items as a baby card.  There a a ton of possibilities with this darling Dresser Step-Card.  Have fun with it and please share your ideas of what you come up with.


Floral Warm Wishes Card

Hello Stampin' Friends!

I'm going to try and post a few things each day until I have everything loaded from Convention 2012.  Then we will try and get back to normal.  But I figure you like seeing all the goodies and info from Convention, so those I will try and get posted first while it's still fresh.

Anyway, onto today's cards and such!

This card was for a swap that I did at Convention 2012.  It's from a swap that was called Over the Top.  We met at the Marriott on Wednesday night and had dinner and some projects and swapped.  Had a great time and would love to be a part of that again.

Step-card outside/front view
Step-card inside view

I call this card - Floral Warm Wishes

SU! Supplies Used
Stamps - Blooming with Kindness, Bring on the Cake
CS - Elegant Eggplant, Lucky Limeade, Very Vanilla
Specialty - Vellum CS
Inks - Elegant Eggplant
Punches - Elegant Butterfly
Dies - Fun Flowers
Framelit - Apothecary Accents
Emboss Folder - Perfect Polka Dots, Lattice
Jewels - Basic Rhinestones
Misc - Big Shot, Dimensionals, Glue Dots

This is one of those step-cards.  I had equal amounts on both sides and a little bit larger center.  But you could change it up and do it anyway you want.  I cut pieces of Lucky Limeade CS and embossed them with the Lattice Emboss Folder then attached to the card front.  I then diecut the flowers from the Fun Flowers Die using the Big Shot.  Once they are cut I then embossed them using the Perfect Polka Dots Emboss Folder.  I sponged the edges of the flowers using the Elegant Eggplant Ink, then layered the flowers with Glue Dots & Dimensionals.  I stamped the sentiments using Elegant Eggplant Ink from the Blooming with Kindness set.  Then I punched 3 butterflies from Vellum CS using the Elegant Butterfly punch and then embossed them all using the Perfect Polka Dots Emboss Folder.  I attached them to the front of the card and then added some Basic Rhinestone Jewels to each butterfly center to add a little bling.  For the inside of the card I stamped the sentiment using Elegant Eggplant Ink with the Bring on the Cake set onto Very Vanilla CS. I then used the Apothecary Accent Framelits to diecut the shape and then I sponged the edges of the frame with Elegant Eggplant Ink. I diecut another shape from Elegant Eggplant CS and cut it in half and separated it to give a slight accent to the edges.  Then added 2 Basic Rhinestone Jewels and using Dimensionals adhered it to the inside center of the step-card.

I love the way the colors work together without over powering each other.  I think it turned out very pretty and elegant.  Hope you enjoy it as well.

Saturday, July 28, 2012

Butterfly Birthday Card

Hello Stampin' Friends!

This is a card I did for the Late Night Stampers (LNS) card swap group.  This was a 80+1 card swap for SU! Convention 2012.  I'm still sorting through all my swaps and will be posting about the different swaps as soon as I have them all sorted and photographed, so be sure to check back and see what I received while I was at convention.

Anyway, onto what I made for the swap!


I call it - Butterfly Birthday

SU! Supplies Used
Stamps - Papillon Potpourri, Itty Bitty Banners, Flowering Flourishes
CS - Whisper White, Raspberry Ripple,
Inks - Raspberry Ripple, Pink Pirouette
Emboss Folder - Framed Tulips
Punches - Elegant Butterfly
Framelits - Itty Bitty Banners
Jewels - Basic Rhinestones
Misc - Dimensionals, Glue Dots

I really love the simplicity and elegance of this card.  I ran the card front through the Big Shot using the Framed Tulips embossing folder, then I added a layer of Raspberry Ripple CS on top of the card front.  I then took another piece of Whisper White CS and stamped the Flowering Flourishes in Pink Pirouette ink.  Then stamp 2 butterflies from the Papillon Potpourri on Whisper White CS in Raspberry Ripple ink.  Punch out those 2 butterflies using the Elegant Butterfly punch.  The 3rd smaller butterfly is stamped directly onto the piece that you stamped the flowering flourishes on.  I then stamped the Happy Birthday sentiment from the Itty Bitty Banners set onto Whisper White CS using Raspberry Ripple ink.  Using the Itty Bitty Banners Framelits I ran my stamped image through my Big Shot and cut out the sentiment.  Then I attached that and my butterflies to the front of the card and added the Rhinestone Jewels to give it a touch of bling. Now layer that piece on top of the Raspberry Ripple CS. Viola!

Hint** I find that if I use a post-it note to hold my framelit in place that it helps keep things the way I want them.  I've heard others use tape, but I have found that it is easier for me to use the post-it then to mess with tape.  If you have any other ideas I would love to hear them!!

Like I said, I really love the simplicity and elegance of this card.  So easy, yet so pretty!

Thursday, June 7, 2012

Fabulous Birthday Card

Good Morning Friends! The past few days here in NC has been rainy and very dreary.  So here is a card to help brighten up the day and hopefully put a smile on your face.

I made the card for the LNS Color Challenge 176! It's called Fabulous Birthday Card

Stampin' Up Supplies used:
Stamps - Circle Circus, Teeny Tiny Wishes, Petite Pairs
CS - Melon Mambo, Daffodil Delight, Wild Wasabi, Whisper White
DSP - Brights & Subtle Collection
Inks - Melon Mambo, Daffodil Delight, Wild Wasabi
Die - Scallop Squares Duo
Punches - Scallop Edge Border, 1-3/4" Scallop Circle
3/8" Taffeta Ribbon - Whisper White
Brad - Antique
Dimensionals

Had a lot of fun with these colors!  I just love bright, happy cards, and I think this card would definitely brighten up anyone's day!

 Hope you enjoy!


Thursday, May 31, 2012

Prissy Pig Punch Art Card

Hello Friends!  I want to tell you that I had so much fun messing with my punches the other day creating the Lion Punch Art Card that I wanted to play with them some more to see what I could come up with, and here she is Prissy Pig Punch Art Card!  Doesn't she just make you want to smile?!  Since the Lion Card was more boyish I wanted to do something a little more girly.

Stampin' Up Supplies:
Stamps - Fabulous Phrases
CS - Pretty in Pink, Pink Pirouette, Old Olive, Rose Red, Tangerine Tango, Rich Razzleberry, Baja Breeze, Daffodil Delight, Whisper White, Basic Black
DSP - Floral District
Inks - Rose Red, Pretty in Pink, Rich Razzleberry, Tangerine Tango, Baja Breeze, Old Olive
Marker - Regal Rose
Punches - Boho Blossom, Itty Bitty Shapes, Small Heart, 1/2" circle, Owl Builder, Cupcake Builder, Small Oval
Dies - Circles #2, Tasteful Trim
Framelits - Bitty Banners
1/8" Taffeta Ribbon - Daffodil Delight
Misc. - White Gel Pen, Dimensionals

Stay tuned, I've got more Punch Art ideas for you so keep checking back!!

Hope you enjoy!

Wednesday, May 30, 2012

Lion Punch Art Card

Hello Friends!  Today's creation is a Lion Punch Art Card.  It's been a long time since I've done some punch art and decided to try my hand at it again.  I was using the Blossom punch the other day with a different project and thought it would be very cute used as a lions mane. So here is my finished project.

Stampin' Up Supplies:
Stamps - Teeny Tiny Wishes
CS - Very Vanilla, Crumb Cake, Daffodil Delight, More Mustard, Chocolate Chip, Old Olive, Basic Black
Inks - Chocolate Chip, More Mustard, Real Red, Old Olive
Marker - Chocolate Chip
Punches - Blossom, 3/4" circle, Boho Blossoms, Itty Bitty Shapes, Owl Builder, Word Window
Dies - Circles #2, Tasteful Trim
Emboss Folders - Perfect Polka Dots, Houndstooth
Framelits - Bitty Banners
1/8" Taffeta Ribbon - Real Red
Misc. - White Gel Pen, Dimensionals

This was so much fun to do again. I'm going to try and do some different animals and post them here later. So check back again to see those!

Hope you enjoy!

Thursday, May 24, 2012

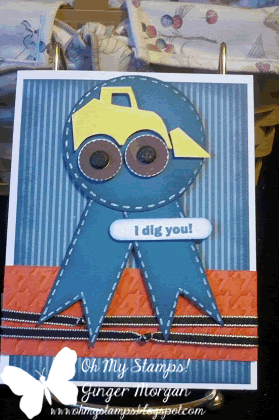
I Dig You Card

Here is another card I made for a challenge.  We were asked to make a Masculine card.

Stampin' Up Supplies used:
Stamp - I Dig You
Cardstock - Whisper White, Island Indigo, Calypso Coral
DSP - In Color Collection
Inks - Island Indigo, Calypso Coral, Daffodil Delight, Chocolate Chip
Brads - Glimmer Basics
Emboss Folder - Houndstooth
Punches - 2 1/2" circle, Word Window
1/8" Taffeta Ribbon - Basic Black
White Gel Pen
Dimensionals

Hope you enjoy!

Ginger Morgan
Stampin' Up Demonstrator
http://ohmystamps.stampinup.net

Monday, May 21, 2012

Cupcake Card

I'm part of a yahoogroup that does challenges, and this challenge was to use some of the retiring DSP.  I chose to use up some of my scraps.

Stampin' Up Supplies used:
Stamps - Create a Cupcake
Cardstock - Whisper White
DSP - Nursery Nest
Ink - Perfect Plum, Blushing Bride, Marina Mist, Pear Pizzazz
Markers - Perfect Plum, Pear Pizzazz
Punches - Modern Label, Cupcake Builder
Jewels - Basic Rhinestones
Dimensionals
Paper piercer

Enjoy!
Ginger Morgan
Stampin' Up Demonstrator
http://ohmystamps.stampinup.net
http://ohmystamps.blogspot.com